Compiling on the R36S
Introduction
In this blog we will explore the most straightforward way to compile on the R36S. Note that there are a few ways we can develop for this device. The approach I will show here is to simply SSH into the device, copy the files over, and compile directly on the device itself.
A more robust approach would be to create a development environment on our local machine, set up the appropriate toolchain, compile locally, and then send the binaries and assets over the network while debugging remotely. However, that approach is considerably more involved, and for now I want to focus on the low-level details of working with the device, so we’ll stick with the first (and easiest) option.
We will take advantage of the fact that Visual Studio supports remote development and has built-in CMake integration. This unfortunately means that readers not using Windows will need to set things up manually with VS Code or a similar editor. Good news is that since we’re still using CMake, the project and source code should work without modification once your development environment is configured.
One last thing before we move on: if you’re planning on buying this device, please pay attention to the store you buy it from. Sadly, there are many counterfeit R36S devices on the market that do not follow the original specifications and instead replace components with cheaper or less capable alternatives.
The hardware is already fairly constrained, so it’s important to get a genuine device, as some features later in this series will assume the presence of the expected GPU capabilities. My recommendation is to look for a model called R36XX. It’s essentially the same device as the R36S, but with built-in WiFi and slightly better ergonomics. Even better is that there are currently no known clones of this model.
For more information, check out this buying guide.
Setup
Let’s now create our CMake project. This is a fairly well-documented process, so I’ll quickly go over the contents. Feel free to copy and paste at this point.
cmake_minimum_required(VERSION 3.16)
project(r36s)

set(CMAKE_CXX_STANDARD 11)
set(CMAKE_CXX_STANDARD_REQUIRED ON)

set(SRCS
    "src/main.cpp"
)

add_executable(${PROJECT_NAME} ${SRCS})
{
    "version": 3,
    "configurePresets": [
        {
            "name": "common",
            "hidden": true,
            "binaryDir": "${sourceDir}/out/build/${presetName}",
            "installDir": "${sourceDir}/out/install/${presetName}",
            "cacheVariables": {}
        },
        {
            "name": "win-x64-debug",
            "displayName": "Windows x64 Debug",
            "generator": "Ninja",
            "inherits": "common",
            "cacheVariables": {
                "CMAKE_BUILD_TYPE": "Debug",
                "CMAKE_C_COMPILER": "cl.exe",
                "CMAKE_CXX_COMPILER": "cl.exe"
            },
            "condition": {
                "type": "equals",
                "lhs": "${hostSystemName}",
                "rhs": "Windows"
            }
        },
        {
            "name": "win-x64-release",
            "displayName": "Windows x64 Release",
            "inherits": "win-x64-debug",
            "cacheVariables": {
                "CMAKE_BUILD_TYPE": "RelWithDebInfo"
            }
        },
        {
            "name": "linux-x64-debug",
            "displayName": "Linux x64 Debug",
            "generator": "Ninja",
            "inherits": "common",
            "cacheVariables": {
                "CMAKE_BUILD_TYPE": "Debug",
                "CMAKE_C_COMPILER": "gcc",
                "CMAKE_CXX_COMPILER": "g++"
            },
            "condition": {
                "type": "equals",
                "lhs": "${hostSystemName}",
                "rhs": "Linux"
            }
        },
        {
            "name": "linux-x64-release",
            "displayName": "Linux x64 Release",
            "inherits": "linux-x64-debug",
            "cacheVariables": {
                "CMAKE_BUILD_TYPE": "RelWithDebInfo"
            }
        },
        {
            "name": "linux-arm-kms-debug",
            "displayName": "Linux ARM w/KMS Debug",
            "generator": "Ninja",
            "inherits": "common",
            "cacheVariables": {
                "CMAKE_BUILD_TYPE": "Debug"
            },
            "condition": {
                "type": "equals",
                "lhs": "${hostSystemName}",
                "rhs": "Linux"
            },
            "vendor": {
                "microsoft.com/VisualStudioRemoteSettings/CMake/1.0": {
                    "sourceDir": "$env{HOME}/.vs/$ms{projectDirName}"
                }
            }
        },
        {
            "name": "linux-arm-kms-release",
            "displayName": "Linux ARM w/KMS Release",
            "inherits": "linux-arm-kms-debug",
            "cacheVariables": {
                "CMAKE_BUILD_TYPE": "RelWithDebInfo"
            }
        }
    ]
}
Note that CMakePresets is a utility provided by CMake to automate the build process for different targets. In our case, it will make working with multiple targets in Visual Studio much simpler, as it will filter out valid targets depending on which machine we’re building on. I’ve also taken the liberty of adding a preset for Linux users so my main target audience has a nice starting point.
We will start with a simple hello world app, as we always do.
#include <iostream>

int main(int argc, char** args)
{
    std::cout << "Hello World!\n";
    return 0;
}
Remote Connection
The R36S has multiple firmwares, and each firmware behaves a bit differently. For the sake of consistency, I will be using dArkOS for now, as it’s currently one the most widely used firmware for this device, and chances are that when you buy this device it will have a firmware similar to this. If you are running a different firmware, some menu names and steps may vary, but the overall goal is the same.
Before continuing, make sure your device is connected to your Wi-Fi network and that SSH access is enabled. On dArkOS, this can be done through the Enable Remote Services option in the settings menu, which starts the SSH server required for remote access. If you’re using another firmware, consult its documentation for the equivalent option.
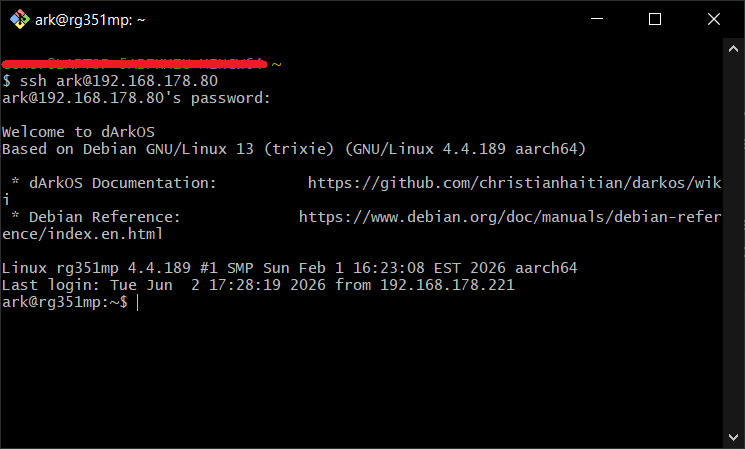
Once SSH is enabled, verify that you can connect from a terminal using the default dArkOS credentials (unless they have been changed): username: ark and password: ark.
It should look something like this:
Great—having that working, you can now open Visual Studio with the CMake project we set up earlier and add your remote device in the Connection Manager.
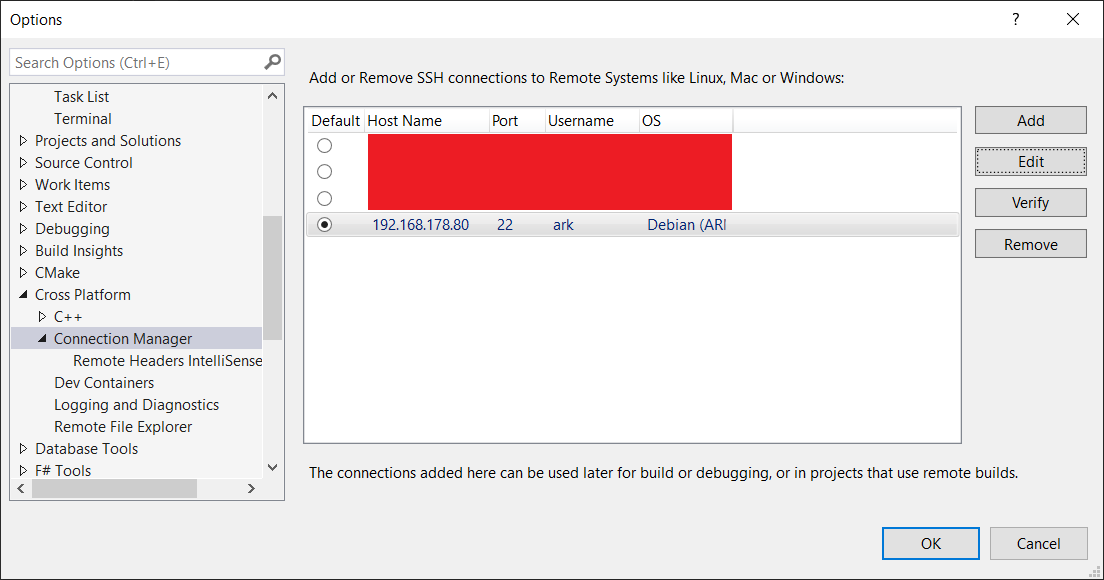
To build and debug remotely from Visual Studio, the target device needs to have build-essential, gdb, cmake, and ninja-build installed. Now is a good time to verify that these dependencies are available. If your device has internet access and is running a Debian-based distribution such as dArkOS, you can install them with:
sudo apt update
sudo apt install -y build-essential gdb cmake ninja-build
When working with this setup, make sure EmulationStation is shut down while developing so it doesn’t interfere with KMS/DRM display ownership or input handling.
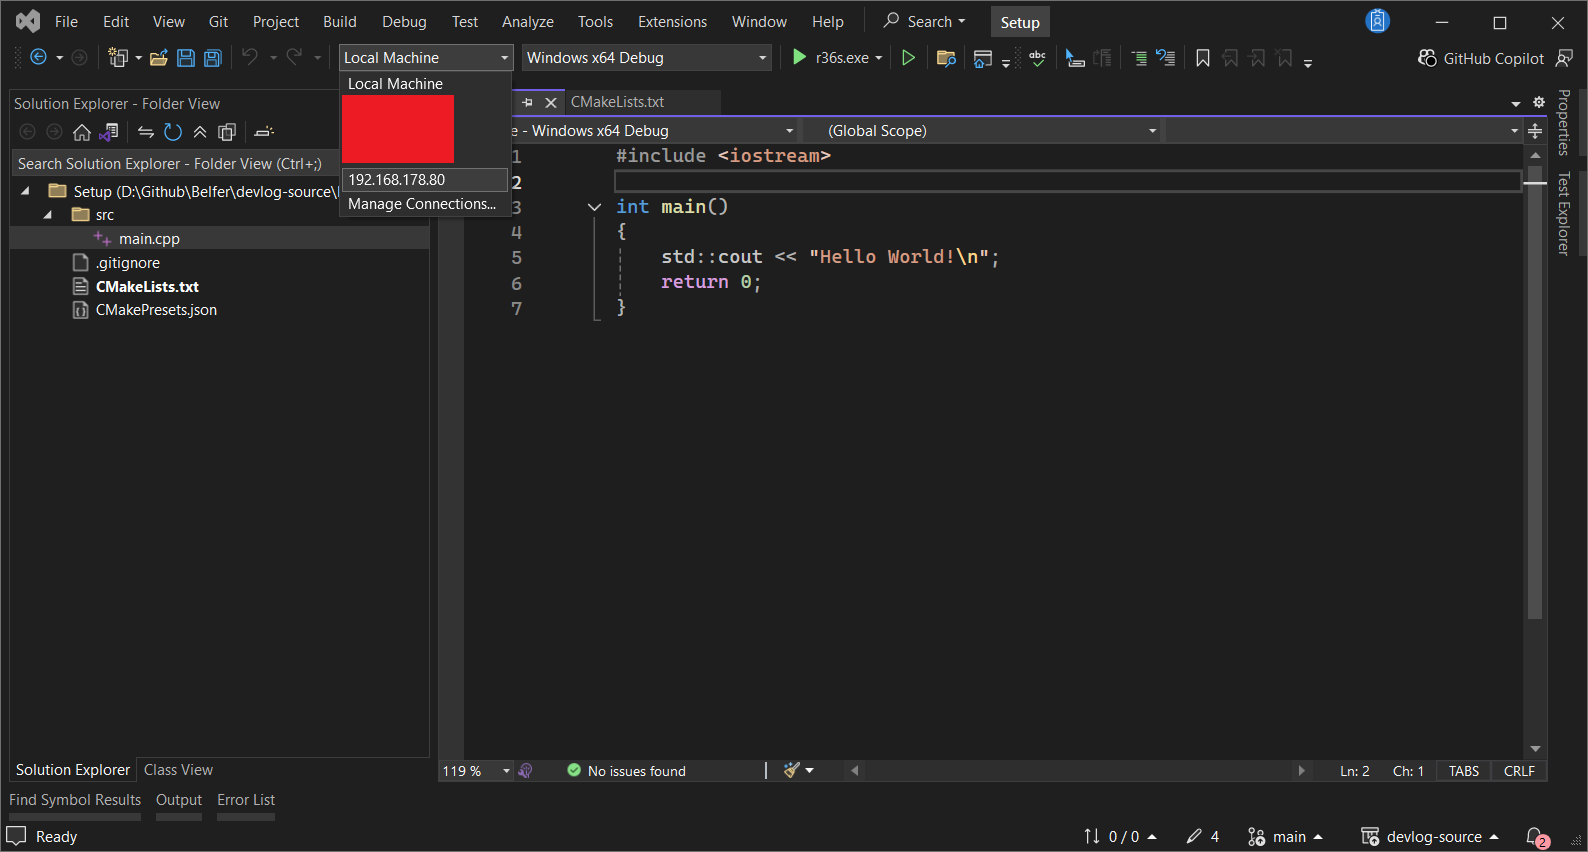
Once everything is ready, select the remote target and start the project.
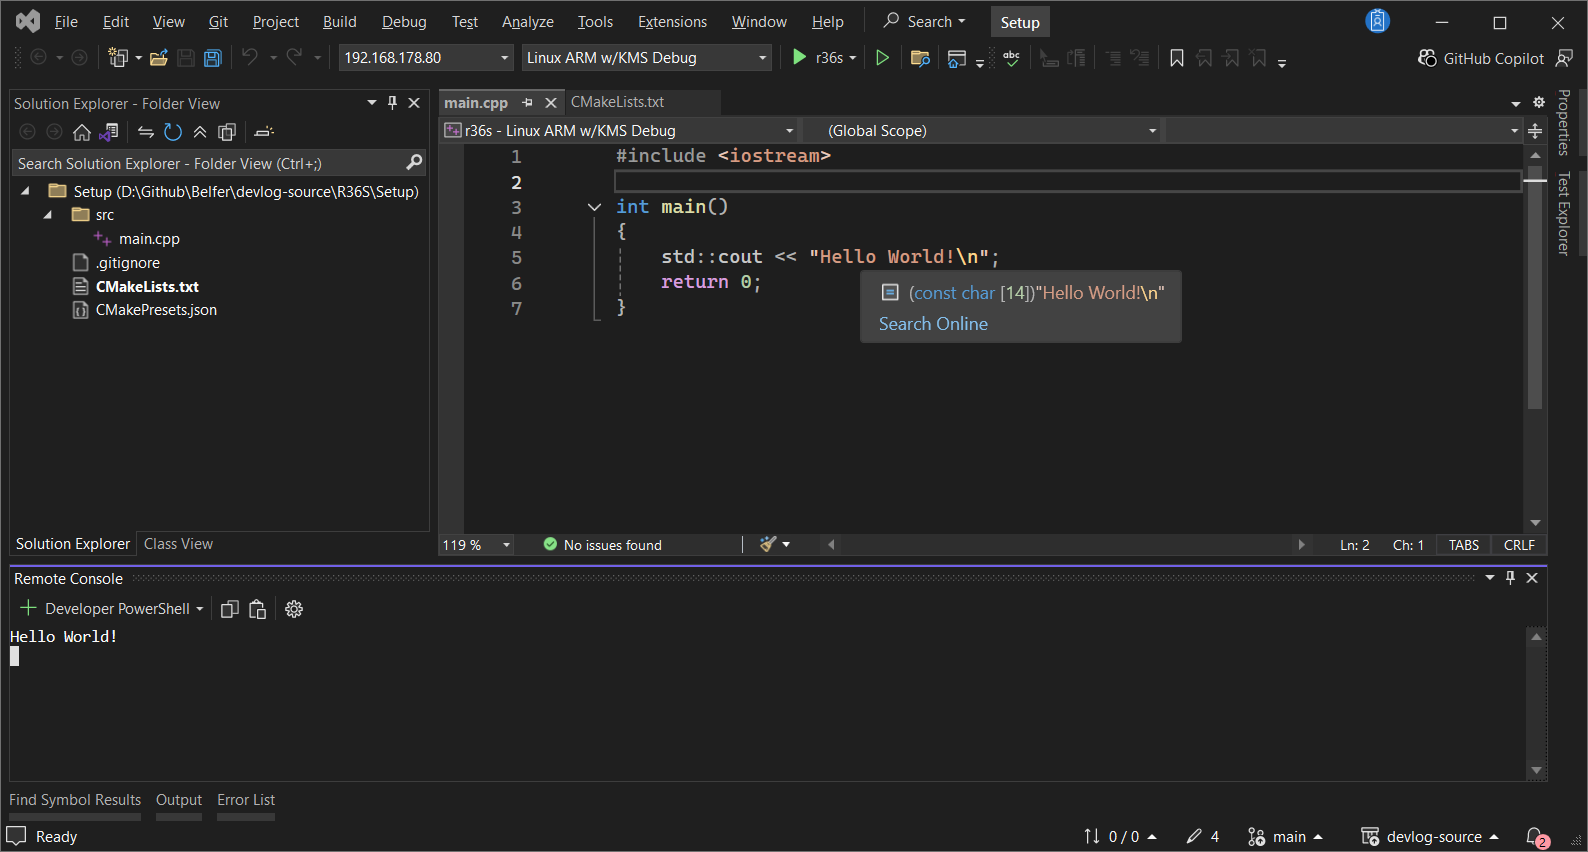
If everything works, you should see a Hello World printed in your Remote Console view.
Simple Application
Now that we have a way to compile, deploy, and run applications on the device, we can wrap up this blog post by building a simple application.
Most R36S firmware distributions do not provide an X11 environment, which means we would have to make our own display manager if we wanted to render something on screen. Doing this manually is quite a bit of work, and it’s something we’ll cover in a future blog.
Luckily for us, the developers of dArkOS have patched SDL2 and provide it as a shared library on the system. For us, that means we can simply link against it and, just like that, have access to the SDL2 API. This is a much nicer API to work with than the Linux kernel mode setting (KMS) interfaces that SDL uses internally.
So, let’s add the dependency and create a simple app:
cmake_minimum_required(VERSION 3.16)
project(r36s)

set(CMAKE_CXX_STANDARD 11)
set(CMAKE_CXX_STANDARD_REQUIRED ON)

set(SRCS
    "src/main.cpp"
)

add_executable(${PROJECT_NAME} ${SRCS})

# For PC you can find binaries here:
# https://github.com/libsdl-org/SDL/releases/tag/release-2.32.10

find_package(SDL2 REQUIRED)
target_link_libraries(${PROJECT_NAME} PRIVATE SDL2::SDL2)
#include <SDL2/SDL.h>
#include <iostream>

#define APP_TITLE "SDL Test"
#define DISPLAY_WIDTH 640
#define DISPLAY_HEIGHT 480

int main(int argc, char** args)
{
    if (SDL_Init(SDL_INIT_VIDEO) != 0)
    {
        std::cerr << "SDL_Init failed: " << SDL_GetError() << '\n';
        return 1;
    }

    SDL_Window* window = SDL_CreateWindow(
        APP_TITLE,
        SDL_WINDOWPOS_CENTERED,
        SDL_WINDOWPOS_CENTERED,
        DISPLAY_WIDTH,
        DISPLAY_HEIGHT,
        0
    );

    if (!window)
    {
        std::cerr << "SDL_CreateWindow failed: " << SDL_GetError() << '\n';
        SDL_Quit();
        return 1;
    }

    SDL_Renderer* renderer = SDL_CreateRenderer(window, -1, 0);

    if (!renderer)
    {
        std::cerr << "SDL_CreateRenderer failed: " << SDL_GetError() << '\n';
        SDL_DestroyWindow(window);
        SDL_Quit();
        return 1;
    }

    SDL_SetRenderDrawColor(renderer, 100, 149, 237, 255);
    SDL_RenderClear(renderer);
    SDL_RenderPresent(renderer);

    SDL_Delay(3000);

    SDL_DestroyRenderer(renderer);
    SDL_DestroyWindow(window);
    SDL_Quit();

    return 0;
}
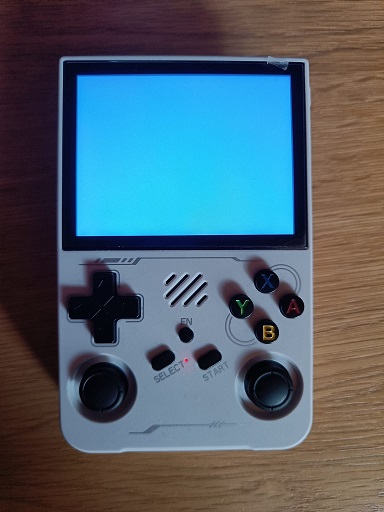
And isn’t that nice and easy? We now have a working setup for real-time application development on the R36S.
In the following blog posts, we will start working on a simple engine using SDL2. The idea is to begin exploring the capabilities (or rather limitations) of the device and gradually work toward some optimization strategies commonly used in game engines.
That wraps it up for now—see you in the next posts!